
Guide to Applications
How to Attach Console Applications
Console applications can vary from a single action attached to an element in an existing tree structure such as a page to a stand-alone highly-hierarchical tree structure of elements with attached actions.
To have the application appear in the console GUI, you should always specify:
- Where the application should be attached
- How the application should be attached
A console application can be attached to:
- An existing element of a specific type (for example, a page)
- A root (normally implicit) of an existing perspective (for example, “Content”)
- A root of its own perspective
The application can appear in all these points of attachment:
- Automatically
- Only when attached manually by the user
Normally attaching an application manually is relevant only for existing elements of specific types. In this case, the element gets two new actions on its context menu:
- “Add application”
- “Remove application”
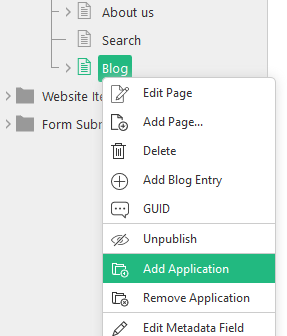
Figure 7: Attaching applications via the context menu
The user can thus add (attach) and remove (detach) an application. The manual attachment is regarded as “allowed”.
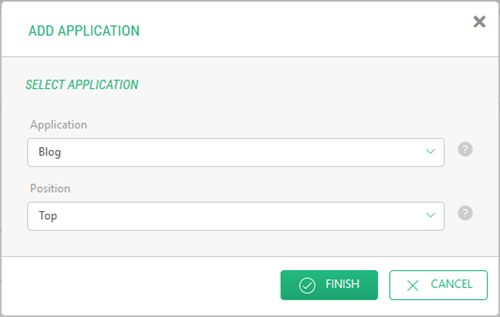
Figure 8: Selecting an application to attach
Based on the way you intend your application to appear in the console, you should specify whether you want to:
- auto-attach an application
- allow users to attach application manually
When that decided, you should proceed to select where you want your application to appear.
How to Auto-Attach Applications
The application can automatically appear as a tree structure in one of the perspectives or in its own new perspective. This type of application is regarded as an “Auto Attachment”. For example, the Page Types application appears in the Layout perspective automatically.
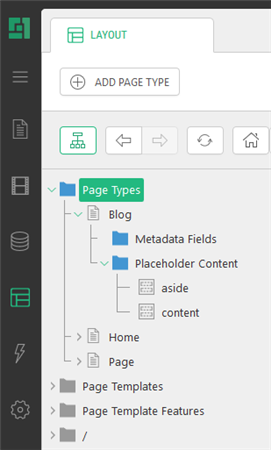
Figure 9: Auto-attached application
To auto-attach an application in a perspective:
- Add the ElementStructure.AutoAttachments element within the ElementStructure element.
- Add the NamedParent element within the ElementStructure.AutoAttachments element.
- Set its required attribute:
- Name: The name of the perspective to attach the application in.
If necessary, set its optional attribute:
- Position: The position in the tree structure the application should appear at
<ElementStructure.AutoAttachments>
  <NamedParent Name="Layout" Position="Top" />
</ElementStructure.AutoAttachments>
Listing 3: Auto-attaching the application in Layout
Please note that the application can only appear in one perspective.
Normally, you can select one of the existing perspectives here. However, you have two more options:
- You can have the application appear below the Website Items in the Content perspective (“Content.WebsiteItems”)
- You can have the application appear in its own perspective (“PerspectivesRoot”).
Please note that to make the new perspective available in the Administrative console, you should grant access to this perspective to proper users or user groups.
You may as well auto-attach the application to an existing element (for example, a page):
- Add the ElementStructure.AutoAttachments element within the ElementStructure element.
- Add the DataType element within the ElementStructure.AutoAttachments element.
- Set its required attribute:
- Type: The data type, the items of which the application will be attached to
If necessary, set its optional attribute:
- Position: The position in the tree structure the application will appear at
<ElementStructure.AutoAttachments>
  <DataType Type="Composite.Data.Types.IPage" Position="Top" />
</ElementStructure.AutoAttachments>
Listing 4: Auto-attaching the application to an element of a specific data type
Please note that you can attach the application to multiple data types.
<ElementStructure.AutoAttachments>
  <DataType Type="Composite.Data.Types.IPage" Position="Top" />
  <DataType Type="Composite.Data.Types.IPageTypes" Position="Bottom" />
</ElementStructure.AutoAttachments>
Listing 5: Auto-attaching to elements of multiple types
How to Allow Attaching Applications Manually
You can have users manually add the application to an existing element (for example, a page or a data item). The application will thus appear as a child element. This type of application is regarded as an “Allowed Attachment”.
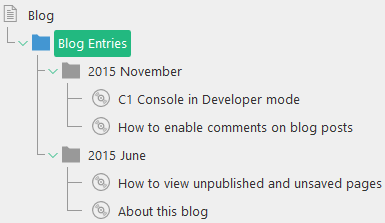
Figure 10: Manually attached application
Two new actions (“Add application” and “Remove application”) appear in the element’s context menu, which enable users to add or remove this application at will.
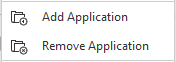
Figure 11: Menu commands to attach applications
To allow users to attach an application manually:
- Add the ElementStructure.AllowedAttachments element within the ElementStructure element.
- Set its required attribute:
- ApplicationName: The name of the application to refer to when adding or removing it
- Add the DataType element within the ElementStructure.AllowedAttachments element.
- Set its required attribute:
- Type: The data type, the items of which the application is allowed to be attached to
If necessary, set its optional attribute:
- Position: The position in the tree structure the application will appear at
<ElementStructure.AllowedAttachments ApplicationName="Blog">
  <DataType Type="Composite.Data.Types.IPage" Position="Bottom" />
</ElementStructure.AllowedAttachments>
Listing 6: Allowing manually attaching the application
You can add as many data types as you need.