
Guide to Applications
An Overview of Console Applications
Let’s start with a few scenarios that help illustrate the use of console applications in C1 CMS.
- Scenario 1: A custom action on tree elements in one of the C1 CMS perspectives.
By using a console application, you can attach a custom action to an element in the tree structure in one of the perspective.
For example, you want to display the GUID of a selected page in the Content perspective.
The simplest way would be to have a message box pop up and show the GUID.
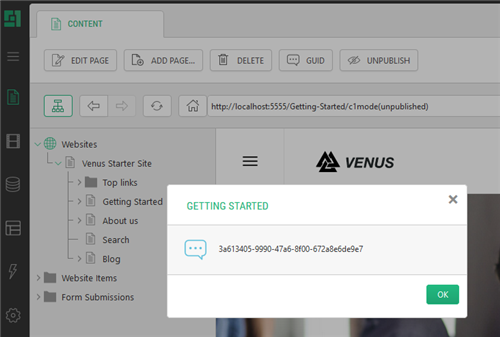
Figure 1: A custom action attached to a tree element
You can implement it by attaching the message box action to the IPage data type that represents pages in C1 CMS. An additional button appears on the toolbar and in the context menu when you select a page. When you click the button, the logic that gets the current page’s GUID is implemented and the message box displays it to you.
<ElementStructure xmlns="http://www.composite.net/ns/management/trees/treemarkup/1.0" xmlns:f="http://www.composite.net/ns/function/1.0">
  <ElementStructure.AutoAttachments>
    <DataType Type="Composite.Data.Types.IPage" />
  </ElementStructure.AutoAttachments>
  <ElementRoot>
    <Actions>
      <MessageBoxAction Label="GUID" MessageBoxTitle="${C1:Data:Composite.Data.Types.IPage:Title}" MessageBoxMessage="${C1:Data:Composite.Data.Types.IPage:Id}"/>
    </Actions>
  </ElementRoot>
</ElementStructure>
Listing 1: Sample code: Attaching a custom action to an existing element
- Scenario 2: A custom tree in one of the perspectives
By using a console application, you can make a tree structure automatically appear in one of the perspectives along with other existing tree structures.
For example, Composite C1 (now C1 CMS) version 1.3 or later exposes the functionality called “Page Types”.
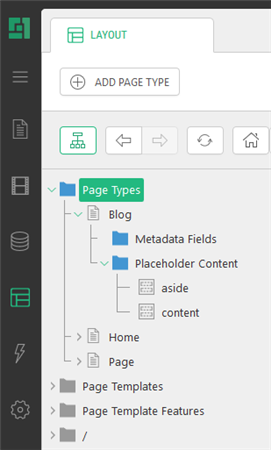
Figure 2: A custom tree in an existing perspective
The Page Types tree structure appears in the Layout perspective along with the Website Templates tree structure. The user can use the Page Types application to effectively manage the page types in C1 CMS.
For a code sample, open ~/App_Data/Composite/TreeDefinitions/PageType.xml
- Scenario 3: A custom tree in a custom perspective
By using a console application, you can make a tree structure automatically appear in a custom perspective.
For example, by changing only one attribute in the above mentioned PageTypes.xml, you can move the Page Types application from the Layout perspectives to its own Page Types perspective.
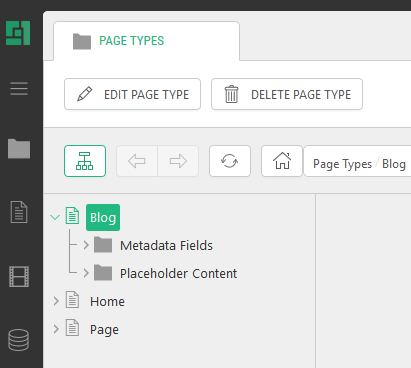
Figure 3: A custom tree in its own perspective
Having an application in a separate perspective can be regarded as a specific case of Scenario 2 where you application appears as a tree structure along with existing ones in one of the perspectives.
- Scenario 4: A custom tree manually added to elements
By using a console application, you can allow users to attach a tree structure to existing tree elements.
For example, you can allow users to manually attach the Blog application to a page in the Content perspective.
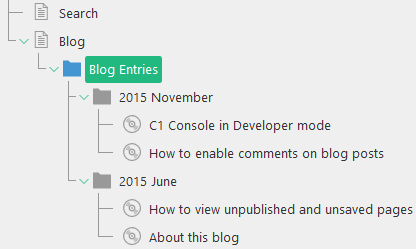
Figure 4: A custom tree manually added to an element
As a result, users can start using the page as a blog page immediately. The Blog’s tree structure contains all the elements and action needed to maintain the blog. It keeps track of blog entries and comments to those entries and the user can add, edit or delete the blog entries.
For a code sample, install the Blog add-on and open ~/App_Data/Composite/TreeDefinitions/Composite.Community.Blog.Entries.xml.
Please note that you can explore more add-ons that use tree definitions for sample markup.
A General Procedure of Creating Console Applications
For you to have a bird’s eye view of how to create a console application, let’s have a look at the major steps you should to take.
- Create an XML file in \App_Data\Composite\TreeDefinitions.
- Add the tree definition’s root element and specify the required namespaces.
<ElementStructure xmlns="http://www.composite.net/ns/management/trees/treemarkup/1.0" xmlns:f="http://www.composite.net/ns/function/1.0">
<!-- tree definition  -->
</ElementStructure>
- Define how and where the application must appear in the console.
<ElementStructure.AutoAttachments>
  <!-- required elements -->
</ElementStructure.AutoAttachments>
or
<ElementStructure.AllowedAttachments>
 <!-- required elements -->
</ElementStructure.AllowedAttachments>
- Add the starting element of the tree structure:
<ElementRoot>
  <!-- elements of the tree structure -->
</ElementRoot>
- Create a tree structure combining simple elements and data elements if necessary.
<Children> <Element> <Children> <DataElements> <!-- other nested elements if needed --> </DataElements> </Children> </Element> </Children> - Group the elements by using data folder elements if necessary.
<DataFolderElements> <Children> <DataElements> <!-- other nested elements if needed --> </DataElements> </Children> </DataFolderElements> - Sort the data elements if necessary.
<DataElements> <OrderBy> <Field /> </OrderBy> </DataElements> - Filter the data elements if necessary.
<DataElements> <Filters> <FieldFilter /> </Filters> </DataElements> - Attach actions to the tree elements if necessary.
<DataElements>
  <Actions>
    <EditDataAction />
    <WorkflowAction />
    <CustomUrlAction />
    <ReportFunctionAction />
  </Actions>
</DataElements>
Creating a Tree Definition File
As you can see in the steps above, you are supposed to create a tree definition file for your console application in a specific folder on your website: ~\App_Data\Composite\TreeDefinitions.
You have two options here:
- Since the tree definition file is a file in XML format, you can create the file in your favorite XML editor and upload it to the folder via the CMS Console.
- You can create the tree definition file in the required folder in the CMS Console directly.
The first option makes more sense since many XML editors (for example, the built-in XML Editor in Visual Studio 2010) can provide the developers with additional conveniences such as IntelliSense and validation.
To upload the file to the TreeDefinitions folder:
- Log into the CMS Console.
- In the System perspective, expand \App_Data\Composite\TreeDefinitions.
- Select TreeDefinitions.
- Click Upload File on the toolbar.
- In the Upload File window, click File Upload button, browse to, and select, the file, and click Open.
- Click OK.
Please note that if you have access to the web server’s file system (for example, via the FTP), you can simply copy (upload) the file to the above mentioned folder.
To create the tree definition file in C1 CMS directly:
- Log into the CMS Console.
- In the System perspective, expand \App_Data\Composite\TreeDefinitions.
- Select TreeDefinitions.
- Click New File on the toolbar.
- In the Add New File window, type the name of your application and add the “.xml” extension: e.g. “MyApplication.xml”
- Click OK. The file will open in the right view.
- Add the content to the file and save it.
Please note that once the tree definition file has been placed in the TreeDefinitions folder, C1 CMS picks it up automatically and displays in the console whatever it defines.
Schema Definition File
The console application’s XML schema is defined in a standard schema definition file:
~\Composite\schemas\Trees\Tree.xsd
You can link to the XSD file to your XML tree definition file in Visual Studio 2010 and start using IntelliSense and validation when creating your console applications.

Figure 5: Using IntelliSense
A Quick Overview of a Tree Definition
The following figure illustrates the sample structure of the tree definition file.
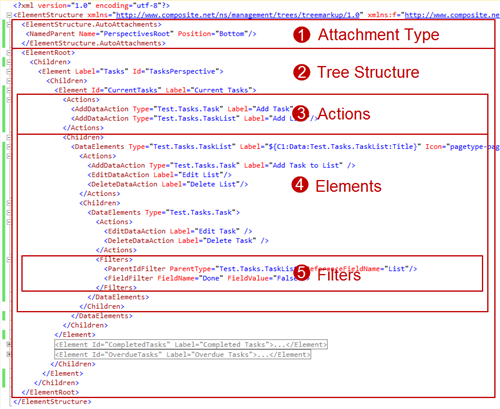
Figure 6: Sample Structure of a tree definition
As you can see from the figure above, the file structure has two main parts: the type of attachment (1) and the tree structure (2).
The tree structure consists of elements. The elements may have child elements (4) and actions (3). The data elements (one of the three element types) can also include sorting and filteringelements (5).
You always start your tree definition file with the root ElementStructure element. This element must have two required namespaces specified:
- xmlns=http://www.composite.net/ns/management/trees/treemarkup/1.0
- xmlns:f=http://www.composite.net/ns/function/1.0
The first namespace defines all the elements of a console application. The second namespace is a standard namespace used to define CMS functions. Some elements in console applications make use of CMS functions. That is why the function’s namespace must be mentioned, too.
<ElementStructure xmlns="http://www.composite.net/ns/management/trees/treemarkup/1.0" xmlns:f="http://www.composite.net/ns/function/1.0">
</ElementStructure>
Listing 2: ElementStructure
The ElementStructure element normally includes:
- one of the two application attachment elements: ElementStructure.AutoAttachments or ElementStructure.AllowedAttachments
- and the required starting element of the tree structure: ElementRoot