
Guide to Applications
How to Execute Custom Commands
When creating console applications, you have three ways of executing custom commands. Each action corresponds to the approach you can take when implementing your custom command: a workflow, a CMS function, or an ASPX page.
- WorkflowAction executes custom workflows.
- CustomUrlAction opens custom ASPX pages on the website.
- ReportFunctionAction executes CMS functions that return data in XHTML format.
How to Execute Custom Workflows
Along with the standard data workflows, you can attach custom workflows to both existing CMS elements and elements defined in your console applications. As a result, users will be able to invoke these workflows in the manner they invoke the standard ones.
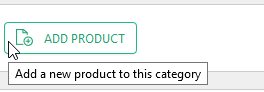
Figure 22: Custom workflow action
The workflow must be created and deployed within the website in advance. For information on creating and using workflows in console applications, please read Form Workflows.
To attach a custom workflow to a tree element, you should use the WorkflowAction element:
- Locate an element to attach the workflow to.
- Add an Actions element within the element if necessary.
- Add a WorkflowAction element within the Actions element.
- Set its required attributes:
- WorkflowType: The type of the workflow
- Label: The label of the workflow action
If necessary, set its optional attributes:
- Tooltip: The custom tooltip of the workflow action
- Icon: The icon of the action
- PermissionTypes: A list of permissions on the workflow action
- Location: The location of the workflow action’s button on the toolbar
<Element Label="Products" Id="C1WorkflowDemo" Icon="pagetype-pagetype-rootfolder" OpenedIcon="pagetype-pagetype-rootfolder-open">
  <Actions>
    <WorkflowAction      Label="Add product..."
      ToolTip="Add a new product to this category"
      Icon="page-add-page"      PermissionTypes="add"      Location="Add"      WorkflowType="C1WorkflowDemo.Workflows.AddNewProductWorkflow, C1WorkflowDemo" />
  </Actions>
</Element>
Listing 29: Attaching a custom workflow
The right-pane view can display ASPX pages located on the website. All you have to do is specify its URL and select one of the views to display the ASPX page in. (For external URLs, see Opening External URLs.)
You should put your custom ASPX pages in /Composite/InstalledPackages or /Composite/InstalledPackages/content/views/<package name>, particularly, if you want to use the controls defined in ~/Composite/web.config.
The URL should be relative and start with “~” (resolved by C1 CMS to the current application path): for example, “~/HelloWorld.aspx”, which means that the ASPX page “HelloWorld” is placed in the root folder of the website.
Based on your needs you can open the ASPX page in one of the four types of document view:
- Generic View
- Document View
- Page Browser
- File Download View
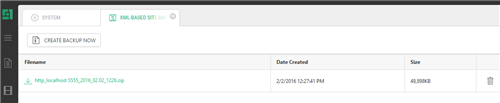
Figure 23: ASPX page opened in the generic view
When the user selects the element you have attached your custom ASPX page to, a button appears in the toolbar and in the context menu.
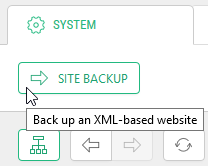
Figure 24: Custom URL action
The ASPX page must include the minimal markup (see below) to work properly. This will ensure that the page’s title is displayed as the tab’s title.
<html xmlns="http://www.w3.org/1999/xhtml" xmlns:ui="http://www.w3.org/1999/xhtml" xmlns:control="http://www.composite.net/ns/uicontrol">
<control:httpheaders runat="server" />
   <head runat="server">
      <title>Page title</title>
         <control:scriptloader type="sub" runat="server" />
   </head>
   <body>
      <ui:page>
         …
      </ui:page>
   </body>
</html>
Listing 30: The mimimal markup of the ASPX page for custom URL actions
To attach this action, you should use the CustomUrlAction element:
- Locate an element to attach the workflow to.
- Add an Actions element within the element if necessary.
- Add a CustomUrlAction element within the Actions element.
- Set its required attributes:
- Url: The URL to open
- Label: The label of the custom URL action
If necessary, set its optional attributes.
- Tooltip: The custom tooltip of the custom URL action
- PermissionTypes: A list of permissions on the custom URL action
- ViewType: The type of the view to open the URL in
- ViewLabel: The label of the view
- ViewToolTip: The tooltip of the view
- ViewIcon: The icon of the view
<Actions>
  <CustomUrlAction  Label="Calendar"
  Url="~/Composite/InstalledPackages/Calendar.aspx" />
</Actions>
Listing 31: Attaching an action to open a custom URL
If the URL requires one or more “post” parameters to go with:
- Add a PostParameters element within the CustomUrlAction element.
- Add a Parameter element within PostParameters element.
- Specify its required attributes:
- Key: The key part of the “post” parameter used with a custom URL
- Value: The value part of the “post” parameter used with a custom URL
- Repeat Steps 2-3 for as many parameters as you need.
<Actions>
  <CustomUrlAction Label="Calendar" Url="~/Composite/InstalledPackages/Calendar.aspx">
    <PostParameters>
      <Parameter Key="Style" Value="Enhanced" />
      <Parameter Key="WeekStartsOnMonday" Value="True" />
      <Parameter Key="ShowWeekNumbers" Value="True" />
    </PostParameters>
  </CustomUrlAction>
</Actions>
Listing 32: Using post parameters with a custom URL action
Alternatively, you can specify post parameters as part of the URL.
<Actions> <CustomUrlAction Label="Calendar" Url="~/Composite/InstalledPackages/Calendar.aspx?WeekStartsOnMonday=True&ShowWeekNumbers=True" /> </Actions>
Listing 33: Appending post parameters to the URL of a custom URL action
If you use post parameters in the URL itself, you can also specify the dynamic values, represented in the markup below with ${…} syntax.
<DataElements Type="Composite.Data.Types.IPage">
...
<Actions>
<CustomUrlAction Url="~/WebForm1.aspx?Id=${C1:Data:Composite.Data.Types.IPage:Id}" Label="ACTION 1!" />
<CustomUrlAction Url="~/WebForm1.aspx?Title=${C1:Data:Composite.Data.Types.IPage:Title}" Label="ACTION 2!" />
<CustomUrlAction Url="~/WebForm1.aspx?Id=${C1:Data:Composite.Data.Types.IPage:Id}&Title=${C1:Data:Composite.Data.Types.IPage:Title}" Label="ACTION 3!" />
</Actions>
</DataElements>Listing 34: Using post parameters with dynamic values in the URL
You can also open external URLs in a new window with the Custom URL Action. For this, specify:
- the external URL in the Url attribute (e.g. ‘http://www.contoso.com/’)
- ‘externalview’ in the ViewType attribute
<CustomUrlAction Label="External URL action" Url="http://www.contoso.com" ViewType="externalview" />
Note: For Internet Explorer 9, the website should be added to the “Trusted sites”; otherwise, the popup blocker may restart the website and any unsaved changes will be lost.
You can attach actions to both existing and newly-defined tree elements to display custom XHTML-based content in a document view by executing CMS functions.
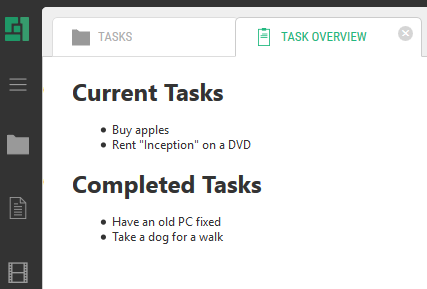
Figure 25: CMS function outputting XHTML in a document view
When the user selects the element you have attached your CMS function to, a button appears in the toolbar and in the context menu.
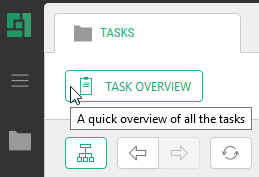
Figure 26: A report function action
The CMS function must be created in advance and output the content in XHTML format. (Read more about creating CMS functions.)
To attach such an action to an element, you should use a ReportFunctionAction element:
- Locate an element to attach the workflow to.
- Add an Actions element within the element if necessary.
- Add a ReportFunctionAction element within the Actions elements.
- Set its required attribute:
- Label: A label of the custom URL action.
- Add a f:function element within the ReportFunctionAction element.
- Set its required attributes:
- name: The name of the CMS function
If the function requires so:
- Add one or more f:param elements within the f:function element.
- Set its required attribute:
- name: The name of the CMS function’s parameter
If necessary, set its optional attribute:
- value: The value of the CMS function’s parameter
If necessary, set the optional attributes of the ReportFunctionAction element:
- Tooltip: The custom tooltip of the report function action
- Icon: The icon of the action
- PermissionTypes: A list of permissions on the report function action
- DocumentLabel: The label of the document
- DocumentIcon: The icon of the document
<Actions>
  <ReportFunctionAction Label="Task Overview" Tooltip="A quick overview of all the tasks">
    <f:function name="DisplayTasks"        xmlns:f="http://www.composite.net/ns/function/1.0">
      <f:param name="ShowDueDates" value="true" />
    </f:function>
  </ReportFunctionAction>
</Actions>
Listing 35: Attaching a report function action to execute a CMS function