
Load User Control
Using Web User Controls in C1 CMS
C1 CMS is an ASP.NET-based content management system that allows you to quickly build and manage websites. This guide is intended for ASP.NET Web developers who work in Visual Studio 2010.
Since you will write code that will implement some functionality on a C1 CMS website, we assume that as an ASP.NET developer you work with Visual Studio 2010. We also assume that you have downloaded and launched C1 CMS in Visual Studio 2010 and installed a sample website. If you haven’t, please refer to “Visual Studio and IIS” and take steps described in it.
In ASP.NET, you can create a custom Web User Control (.ascx) and use it on an ASP.NET page (.aspx). As C1 CMS is an ASP.NET based content management system, you can also use your user control on a page created in C1 CMS.
To make a user control available on a page:
- Add a user control (.ascx file) to the C1 CMS website using Visual Studio.
- Embed this user control within a page using the ad-hoc function in the CMS Console.
Step 1: Creating a Web User Control Using Visual Studio
When you create a user control, you should select where you are going to store it on a website. In general, you can place it anywhere on the website; however, we recommend that you create a subfolder in the Frontend folder and place your user control there.
(The best practice would be to create a hierarchy of subfolders in ~/Frontend that will reflect the namespace hierarchy of your control, then create the Controls subfolder and place the user control there, e.g. ~/Frontend/Custom/Web/Forms/Controls/HelloWorld.ascx.)
You should remember the path to the control on the website because you are going to use the path when embedding the control.
To create a user control:
- Open your C1 CMS website in Visual Studio (see “Hello World Page in C1 CMS).
- In Solution Explorer, right-click the folder where you want to create your user control and click Add New Item.
- In the Add New Item window, select Web User Control, type in the name and click Add. This will generate an empty control and open it in Visual Studio Editor.
- Edit your control. For the purpose of this guide, make it simple - type “Hello, World!” and save it.
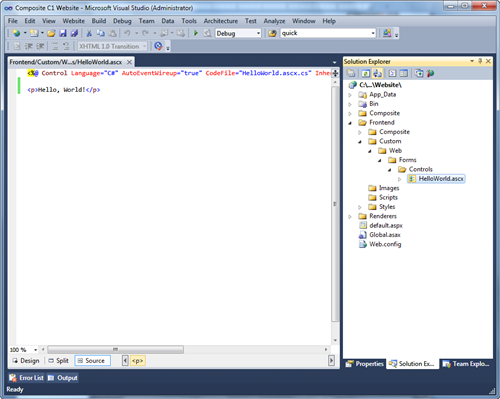
Figure 1: A Web User Control created on the website
This is a very simple sample. Any type of Web user control (ascx) can be thus created and used.
Step 2: Embedding a Web User Control within a Page
To embed a user control within a page, you should use the ad-hoc CMS function – LoadUserControl.
First of all, select where you want your user control to appear:
- Log into the CMS Console.
- In the Content perspective, select the page where you want to embed the user control and click Edit Page on the toolbar. The page will open in Content Editor.
- Place the cursor where you want your user control to appear on the page.
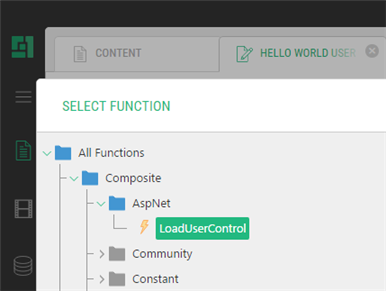
Then, insert the user control using the Composite.Asp.Net.LoadUserControl function:
- On the page’s toolbar, click Insert, then Function.
- In the Select Function window, expand All Functions, Composite, and then Asp.Net and select the LoadUserControl function.
Figure 2: Selecting LoadUserControl
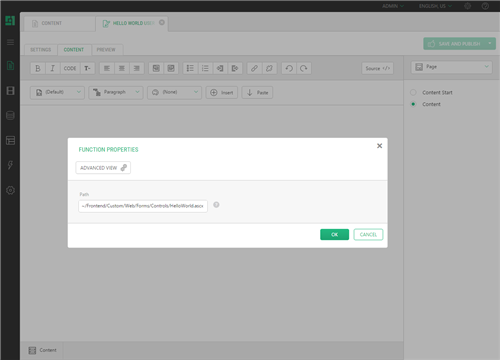
- Click OK. The Function Properties window appears.
- Select the Path property and enter the path to the user control on the website, e.g. ~/Frontend/Custom/Web/Forms/Controls/HelloWorld.ascx.
Figure 3: Specifying the path to the control
- Click OK.
Finally, view the result:
- Save and publish the page.
- In Visual Studio, press F5 to launch the website in the browser and browse to the page. The user control appears on the page with the text that reads “Hello, World!”