
Creating Datatypes
Using Input Forms with Data Types
To allow the visitors of your website to add data to your data types from their web browsers, you should add input forms to web pages.
The Forms Renderer add-on can create these input forms automatically and handle the input information for you. All you have to do is to add the Composite.Forms.Renderer function to a web page and link it to a global data type that will hold the input information.
The data added via these forms will be added to the corresponding data type and can be read or used from within the C1 CMS application.
You can set up this Composite.Forms.Renderer function to receive email notifications every time a person submits data via the form. CAPTCHAs can help you avoid automatic form filling by spam bots etc.
Before you add an input form to one of your web pages, you should:
- Make sure that the FormsRenderer add-on has been installed in your instance of C1 CMS.
- Have a global data type available to hold data entered by the user via the form with all necessary fields added and set up.
To add an input form to a web page:
- Edit a web page where you want add the form.
- On the page’s toolbar, click Insert, Function to open the Select Function window.
- Locate and select the Composite.Forms.Renderer function and click OK.
- In the Function Properties window, for the DataType property, select the data type that will hold the input data for this form. All the fields in this data type will become available in the form via the widgets you selected for this data type.
Figure 52: Setting up Composite.Forms.Renderer function properties
- Set other optional properties such as Intro Text, Response Text, Response URL, Send Button Label, Reset Button Label, Email, Use Captcha.
- Click OK.
- Save and publish the page.

Now users can open this page in their web browsers and fill out the form. All the data entered in this form will be stored in the corresponding data type.
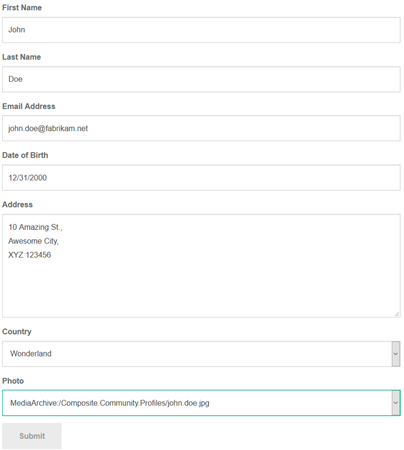
Figure 53: The input form on a web page
The following are the properties you should or can set up for the input form you create:
Composite.Forms.Renderer Function Properties | |
Property | Description |
DataType | A data type to be used to render the form. It will hold values entered via the form. Required. |
Intro Text | An XHTML-formatted text to be displayed above the form before the user submits the form. |
Response Text | An XHTML-formatted text to be displayed instead of the form after the user submits the form. |
Response URL | A page the user is redirected to after she or he submits the form. |
Send Button Label | The caption on the Send (Submit) button to be used instead of the default caption. |
Reset Button Label | The caption on the Reset button to be used instead of the default caption. |
A number of parameters that will enable email notifications on submitting the form. | |
Use Captcha | When checked, it indicates that the form will require to enter the CAPTCHA text to protect from spam bots etc. |
Setting Up Email Notifications
Optionally, if you would like to receive notifications every time a user submits a form on your website, you can set up email notifications for the FormsRenderer add-on used on a web page.
Important: To be able to send email notifications, make sure that you have configured an email host by editing ~/web.config and including the /configuration/system.net/mailSettings section. For information about configuring the e-mail host in web.config, please refer to “Configuring Email Host”.
To send an email notification to one recipient:
- Select the Composite.Forms.Renderer function on a web page and click to select its Email parameter.
- Set its Value type to Execute a function call and the launch the function designer.
- In the Select Function window, select the Composite.Forms.FormEmailHeader function and click OK.
- Specify the parameters of this function and click OK:
- From: The sender’s email address.
- To: The recipient’s email address.
- Cc: An optional field to specify other recipients’ email addresses to send an email notification copy to.
- Subject: The email message’s subject
- Click OK in the Function Properties window.
To send an email notification to two recipients:
- Select the Composite.Forms.Renderer function on a web page and click to select its Email parameter.
- Set its Value type to Execute a function call and the launch the function designer.
- In the Select Function window, select the Composite.Forms.JoinEmailHeader function and click OK.
- Now select the Email A parameter and repeat the above steps for setting up the Composite.Forms.FormEmailHeader function.
- Select the Email B parameter and repeat the above steps for setting up the Composite.Forms.FormEmailHeader function, too.