
Page Types
Example of Creating and Using Page Types
Let’s consider a website where visitors should be allowed to post comments on each page.
To implement the comments functionality, you need to install the Page Comments add-on before you proceed.
You can learn how to implement the comments functionality on a single page in the Page Comments add-on’s documentation.
In a nutshell, you should take these implementation steps:
- Add a page data folder to a page.
- Add a metadata field to a page.
- Add a CMS function to a page.
This looks quite simple if you plan to have one or two pages with comments. It becomes more of a challenge, if you are aiming at a few dozens of pages, each with the comments functionality.
This is where page types come in handy. You can create a page type that will take the above steps for you automatically and instantly. When creating pages, you will select this page type and have the comments functionality implemented immediately on a page.
Let’s take a closer look at what you have to do.
- Create a page type.
- Name it “Comments Page Type”.
Step 2: Add a Page Data Folder to the Page Type
- Add the Page Comments page data folder to the Comments Page Type.
- Save the page type.
Step 3: Add a Metadata Field to the Page Type
- Add the Page Comments Settings metadata field to the “Comments Page Type”.
- Write “Page Comments Settings” in both the Programmatic name and Show with label fields.
Step 4: Add the Function as Default Content to the Page Type
- Select the default layout template for the page type, e.g. “Default Page Template”.
- Add the placeholder content to the page type specifying its ID. It must be the content placeholder in the Default Page Template, e.g. “contentplaceholder”.
- On the Content tab, click Insert, Function, and in the Select Function window, select the Composite.Community.PageComments function. Click OK.
- Save the default content item.
Step 5: Create Pages with the Page Type
- Add a page to the website.
- Select the Comments Page Type.
- Click Finish.
- Repeat Steps 1-3 for as many pages as you need.
As the page has been created, you can see that:
- the Page Comments page data folder has been added to the page
- the Page Comments Settings metadata field has been added to the page on the Metadata tab
- the Composite.Community.PageComments function has been added to the page on the Content tab.
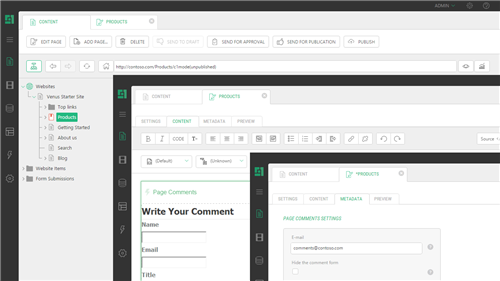
Figure 44: A page of the Comments Page Type created
Please note that if you switch to the Comments Page Type on an existing page, the default content with the Composite.Community.PageComments function will not be added, and you will need to add it manually.