
Customizing Datatypes
Creating Data Types That Reference Other Data Types
One of the ways to make data entry error-proof and faster is to use lists of predefined values in fields instead of having users type their own values.
C1 CMS allows you to create data types with fields that reference other data types for a set of fixed values.
First, you should create a “referenced” data type, that is, a data type that will hold values for another data type.
Next, you should add data items to this data type. The data items will serve as values to select from in a field.
Finally, you should create or edit a “referencing” data type, that is, a data type that will use the values from the “referenced” data type, and add a special field for these values.
For example, you can have a data type for information about car makes and models (“Cars”). One of its fields (“Manufacturer”) stores the name of the company that makes a specific car.
When information about a car is added to the data type, instead of typing the company name in the field, the user selects the existing name from the drop-down list. And these company names are supplied by another data type.
In the following sections you will learn how to create such data types.
Creating Referenced Data Types
A referenced data type is the data type that supplies values for a Data Reference field in another data type.
The procedure of creating a referenced data type is the same as the general procedure for creating a data type. (Pease see A Guide to Creating Data Types.)
This data type may have only one field, the values of which will be used as values in a referencing data type.
If the referenced data type has more than one field, one of the fields will be used to provide values. This is normally a field set to be a “”title” field for a data type.
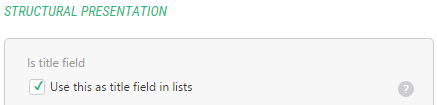
Figure 18: Assigning a title field
Once you have created the referenced data type, you should add data items to it.
Creating Referencing Data Types
A referencing data type is the data type that uses data items of another data type as values in one of its field. This field must be of the Data Reference type and its reference type must be set to the referenced data type.
To create a referencing data type:
- Create or edit a data type (e.g. “Cars”).
- Add a field of the Data Reference type (for example, “Manufacturer”).
- In the Reference Type field, select the data type that will supply predefined values for this field.
- Save the data type.
If this field is required, the Selector widget is used. If the field is optional, the OptionalSelector is used instead. The latter allows the user not to choose any value in this field. It appears on the drop-down list as the <NONE> option and is pre-selected by default.
When the user adds a data item to the data type, he or she will be able to choose a value from the selector. Each value is a separate data item in the referenced data type.
Grouping by Data Reference Fields
When using data types that reference other data types, you can create hierarchies of data items within these data types. These hierarchies can significantly help users in both locating existing items and adding new items.
Locating a data item in a hierarchy implies locating it within a specific group. Adding an item under a specific group within a data type initializes its values to those pre-defined by the group.
For example, the Cars data type might have many data items already added. In a “flat” view, each data item representing a car model will be placed immediately under the Cars data type in the Data navigator.
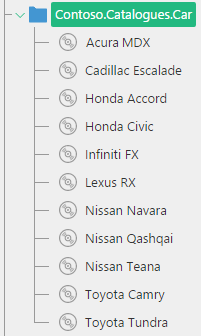
Figure 19: Data items listed in a “flat” view
You can however group the car models first by their manufacturers, and then by their brand names.
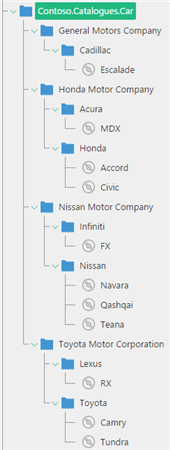
Figure 20: Data items listed hierarchically
To group data items within data types:
- Edit a data type.
- Select a field you want to serve as Level 1 grouping category for data items. This should be a field that references a data type, which serves as a category or type for a data item. For example, in the Cars data type, it might be the Manufacturer field that references the Manufacturers data type.
- On the Advanced tab, in the Field grouping dropdown list, select Group by this field.
- Save the data type.
If you need more levels in the hierarchy, repeat the above procedure. When setting a field to serve as the Level 2 grouping category, select Group as 2. priority. For example, in the Cars data type, it might be the Brand field that references the Brands data type.